Ten Ways to Use a Robot-Mouse!
This Robot-Mouse from Learning Resources has quickly become my new favourite resource. Originally I bought it to teach position and direction to my KS1 homeschool group, but when I started planning the lesson, it opened my mind to the numerous ways it could be used, and not just in maths teaching.

I love a cross-curricular approach and some of my favourite lessons are when I incorporate several subjects in one – for instance, linking history to maths when teaching place value (the Ancient Egyptian number system being my favourite). However, it hadn’t occurred to me before that I could link maths with spelling 😀 Read on to find out how!
1) Position and Direction
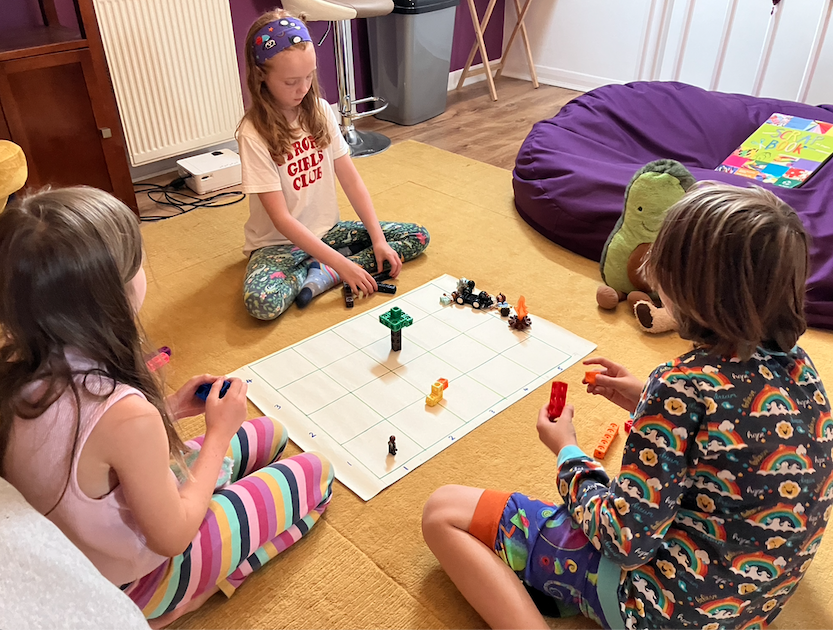
I will begin with the most obvious way to use the mouse, which is to support the teaching and learning of position and direction. You can buy the kit with the plastic track and additional obstacles and components, or get the mouse on its own and make your own grid, which is what I did initially. I worked out the mouse needed squares of 12x12cm, so got my trusty roll of wallpaper out, and drew the grid.

In my position and direction lesson with my KS1 group, I firstly got them to create obstacles such as bridges, trees and walls made out of multilink cubes. They chose where they wanted to position them and I set them a challenge to navigate the mouse to a particular square on the grid. They worked together to choose the correct directional cards to use first, and then took in turns to press a button on the mouse.
They worked so well as a team and it also developed their use of positional language and left & right.
2) Co-ordinates
For a super-fun launch lesson on co-ordinates, you can easily turn this home-made grid into a co-ordinate grid with addition of numbers along the x and y axes.
With my KS2 homeschool group, I started by teaching how to read co-ordinates on a grid, which some knew already, and we practised ‘along the corridor and up the stairs’.
I then gave them the multi-link cubes and set them the challenge of creating various obstacles. They were incredibly creative and by the end we had the following:
(1,4) a swamp with a stuck Duplo man
(2,3) a bottomless pit
(3,1) a ferocious duck lake
(3,3) a tree with a vicious squirrel
(5,1) a car
(5,3) a raging fire and a wall of fire
(5,4) a slime dungeon


We placed the mouse on (1,1) and then I set them a challenge initially to get to the slime dungeon. They worked as a team to choose the arrow cards they would need and then inputted these into the mouse. They then came up with the idea of ‘rescuing’ the Duplo people with the mouse, so they programmed it so it would pass each person and then they would be ‘rescued’! This was really fun.
Next, I gave each pupil an individual challenge so wrote co-ordinates on a white board for each of them, and they had to choose the arrow cards and then get the mouse to their destination.
3) Teaching Shape!
Robot-Mouse is a fantastic way of teaching shape names and making it fun! When teaching names of shapes, I always use the Syllable Clapping game. This is a technique I learnt in a lecture at university when I did my music specialism. You start with an unknown word and ‘clap’ the number of syllables it has whilst chanting the name.
Here is a video of the clapping and chanting for your visual & auditory pleasure. And also so you know what I’m going on about 😀
Once the children are confident, I ‘clap’ the name of the shape and then they have to say what it is. If two shapes share the number of syllables, they say both – e.g. kite and square are both one clap.
In my homeschool KS2 lesson on Thursday, we were learning names of quadrilaterals, so after playing the clapping syllable game, I laid out the quadrilaterals on the grid. I then set each pupil a challenge – I clapped the name of the shape I wanted them to get to, and then they programmed the mouse. They could choose to go the simplest way or a complicated way, so most of them chose the complicated way haha.

4) Times Tables
At the moment in my KS2 maths groups, we are focussing on the 3,6 and 9x tables. So for this game, I wrote times table facts from these tables on 7 cards and numbered them. I gave each card number a co-ordinate for the grid. The pupils firstly had to use their co-ordinates knowledge to place the cards correctly, and then I gave them a sheet with 7 sets of programming instructions.
They took in turns to program the mouse, but first they worked out which one it would go to, based on the instructions.
Once they reached their times table card, we worked out the answer using Numicon on the number line. This developed skills such as skip counting and also understanding of the commutative law. For instance, if someone landed on 6×9, they said they could use six 9s or nine 6s.

5) Understanding of multiplication
This is an idea from Minnie Minds – start with a times table fact, such as 4 x 3, and input four moves forward three times, and then they can count to see how many moves the mouse makes in total. The mouse is able to cope with 40 different moves so you could discuss with children what the maximum multiplication fact would be that it would cope with!
They might say anything below 10 x 4, and then you could write down all the times table facts that equal a number less than 40.
6) Addition
Another idea from Minnie Minds – you could use the Robot-Mouse to practise addition facts. For instance, if a child was working out 6+4, they could tap in 6 then 4 moves on the forwards arrow, and see how far the mouse goes. Thinking about it, this could also work for subtraction. I’m imagining having a grid drawn out on wallpaper that’s 10 x 1 for instance, with numbers 1-10 written in each box, and you give the sum 10-4. Pupils input 10 forward moves into the mouse, then 4 backwards ones and see what number the mouse ends up on.
7) Treasure maps and compass points!

For a geography link (thank you Lauren for this one), you could create a treasure map on the wallpaper and they can use North, East, South and West to navigate the mouse to various points on the map.
This is a good treasure island map from Nrich. For this activity to work with the mouse, you’d have to re-draw it so that each grid square is 12x12cm and then put the mouse along the grid lines instead of within them.
8) Adventure stories
Get children to invent lots of interesting places (this is actually a really fun Pie Corbett game that I often use to stimulate children’s creativity). They come up with a place and then an interesting noun and put them together. For example – the cave of shadows, the dungeon of dreams etc. Create these or draw these on a map. Then set the mouse off on an intrepid adventure through all the places. Write the story of the mouse’s journey through each place, describing each one. You could also write a diary if you change it so it’s from the perspective of the ‘mouse’ or whoever you want it to be.
9) Instructions
With the adventure story idea, you can also use this for instructional writing. Set a goal – e.g. Mount Merapi to become a firework maker (this is a lesson I invented based on the Firework Maker’s Daughter which I absolutely love teaching). Then direct the mouse to get there and write a set of instructions. Remember to begin with a hook, then you will need, before writing the method. This could help children structure their writing. For more reluctant writers, they could even collect a sentence opener at each place to help them.
10) Spellings!
I invented this game at the same time as the times table one, so it’s exactly the same set up, but instead of times tables facts, you have words or parts of words linked to the spelling rule you are teaching. For instance, last week, I was teaching suffixes to a year 4 pupil, so I wrote them on to cards and laid them out on the grid. She programmed the Robot-Mouse following the instructions and then when she landed on a suffix, she had to come up with a word that could go in the front, create a sentence and then write it down. For more spelling inspiration, you might like to read my blog on Spelling Strategies.
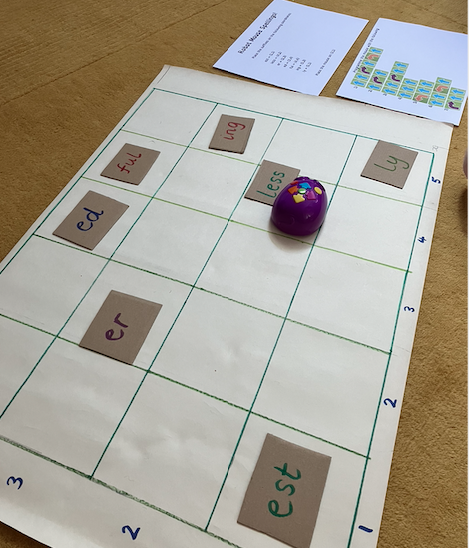
The spelling activity I set up for the following week’s lesson involved my pupil spending 4 minutes to create obstacles on the grid, where I then placed images representing different verbs.
I said a verb and my pupil had to programme the mouse to get to the image. She then glued it into her book, wrote the root verb, and then variations of the word using different suffixes.


So there we have it!
Ten ways to use a Robot-Mouse! Comment below if you’ve successfully done any of these, and if you have any extra ideas, let me know 😀
Thanks a lot for sharing this with all people you
actually realize what you’re talking about! Bookmarked.
Kindly also visit my website =). We can have a link change agreement among us
Wonderful blog! I found it while browsing on Yahoo News.
Do you have any tips on how to get listed in Yahoo News?
I’ve been trying for a while but I never seem to get there!
Many thanks
First of all I would like to say fantastic blog! I had a quick question which I’d like to ask if you don’t mind.
I was interested to know how you center yourself and clear your head prior to writing.
I have had trouble clearing my thoughts in getting my ideas out there.
I truly do take pleasure in writing however it just seems like the first 10 to 15
minutes are generally lost just trying to figure out
how to begin. Any suggestions or tips? Thanks!
This is very interesting, You’re a very skilled
blogger. I have joined your rss feed and look forward to seeking more of your wonderful post.
Also, I have shared your site in my social networks!
It’s hard to come by well-informed people in this particular topic, but you seem like you know what you’re talking about!
Thanks
Hello, all is going nicely here and ofcourse every one
is sharing information, that’s truly fine, keep up
writing.
Howdy very nice blog!! Man .. Beautiful ..
Wonderful .. I’ll bookmark your site and take the feeds additionally?
I’m satisfied to search out numerous useful information here in the submit, we want work out more strategies
on this regard, thanks for sharing. . . . . .
This post is worth everyone’s attention. How can I find out more?
This blog was… how do I say it? Relevant!! Finally I’ve found
something that helped me. Appreciate it!
Excellent blog. Additionally, your site loads up very quickly. Which host do you use? Could you provide me with your affiliate connection to that host? I wish my site could load up as quickly as yours.